Big picture of Analytics service

Abstract

Most of the users of RICHKA, which is the main product of our company, uses the generated media for their advertisement. Analytics service enables to see the dashboard of important metrics for marketers.

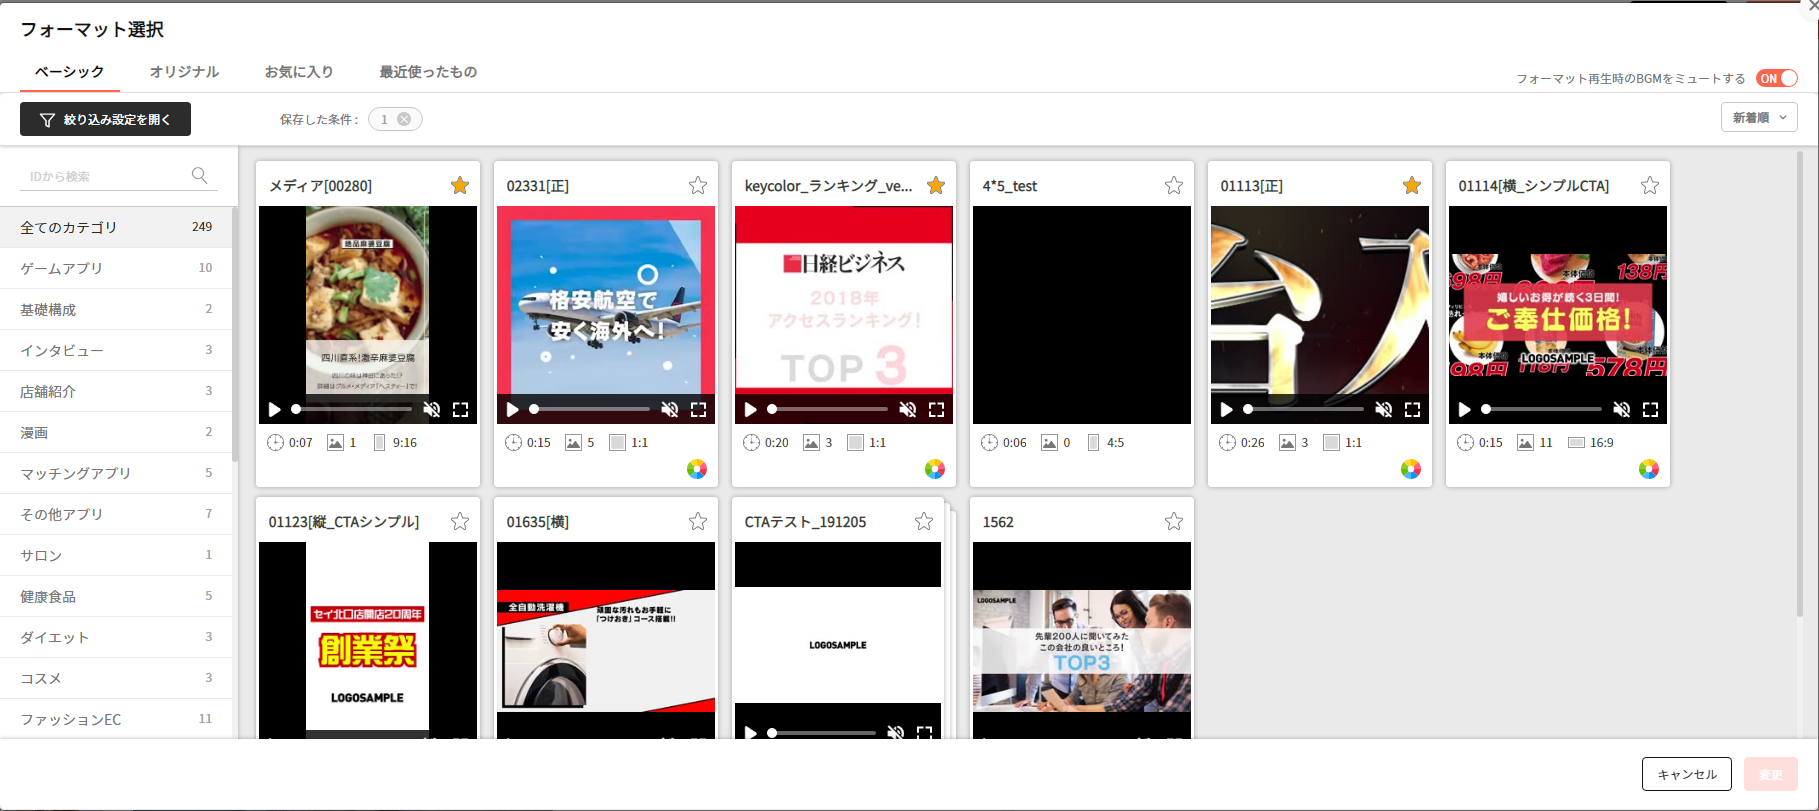
The picture below is an example of the dashboard for a Facebook Ad account. The numbers in the top tab show the current values and increases, decreases compared to the previous period. The bar graph under the tabs shows the transition of metrics in the target period.

nil

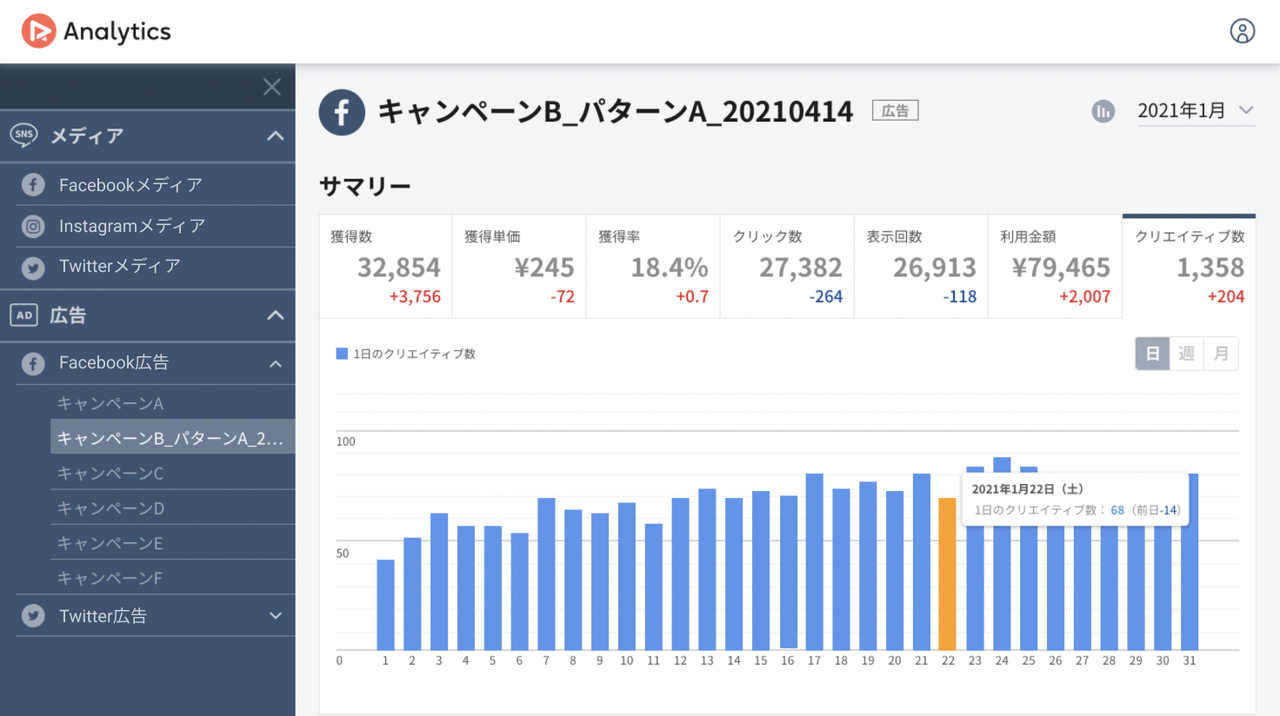
The advantage of this service is you can connect various kinds of SNS/ad accounts and see the graph with the same UI. Usually, marketers should jump to the official analytics page of each advertisement service to check the outcome and each has a different UI specification from others. The left menu lists the accounts which you have connected previously with OAuth and you should just click the account you want to check. That should be convenient for marketers who operate multiple accounts.

Analytics is compatible with Facebook media/ad, Instagram media, Twitter media/ad, Google ad, and Yahoo ad account at the moment.

Architecture

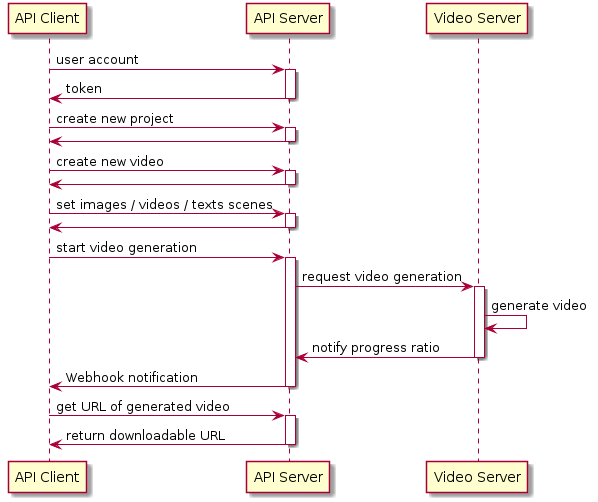
In this section, I will show you the big picture of Analytics.

nil

The main function of this product is to display graphs of important metrics for operating SNS/ad accounts.

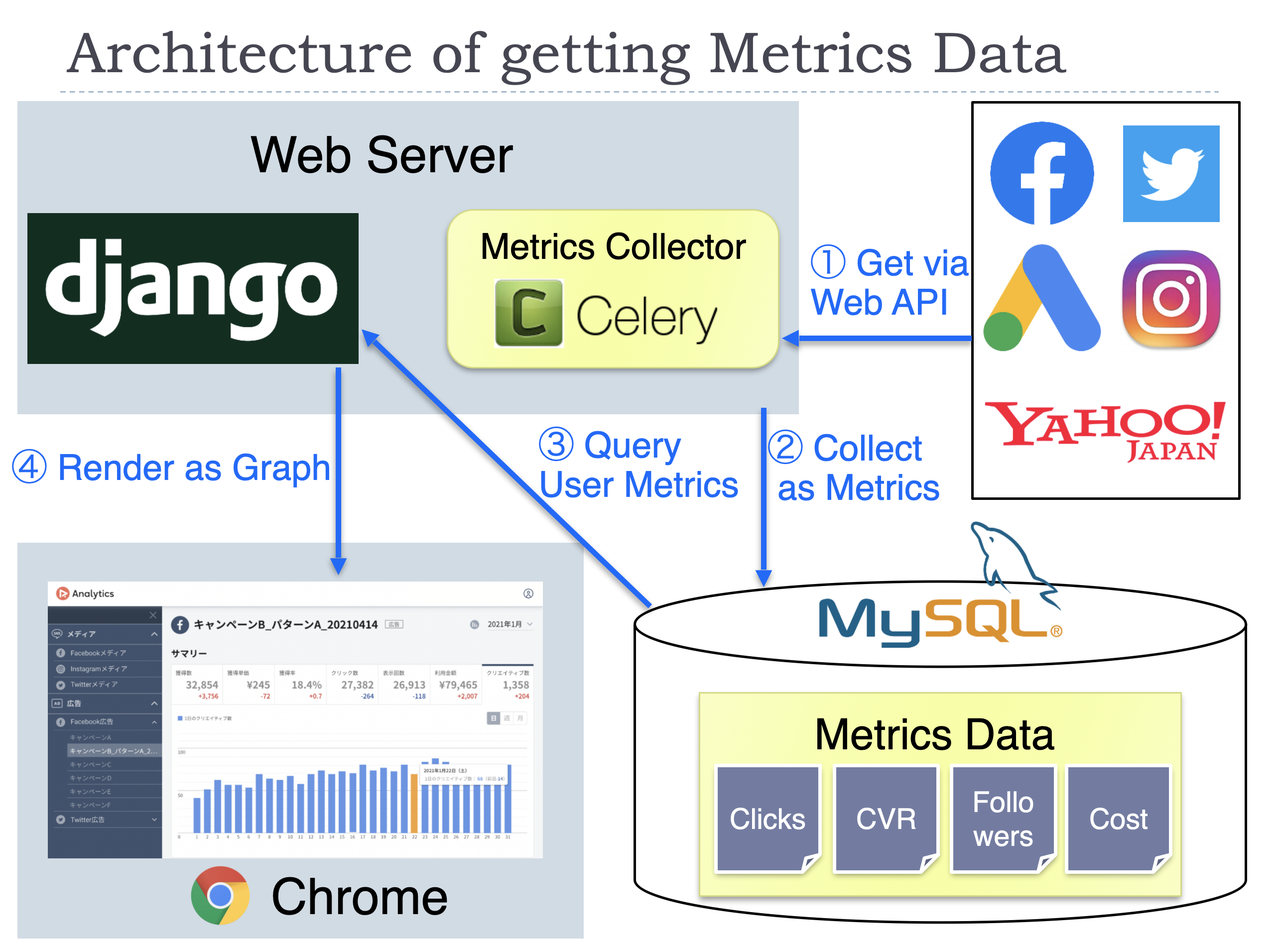
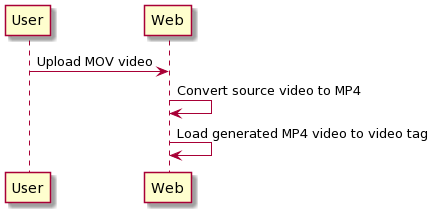
One of the big features of our architecture is usually we don't get the metrics data on the fly via each API when a user accesses the dashboard page. Instead, the metrics data is already in our DB at that time for most cases. The detailed steps in the figure are as below.

  1. Get the required data from the APIs of the advertisement service. This step is processed in the two situations. The first situation is when you link your account first time. The web server will start to collect the past metrics data (about last year's) as a background process. The second situation is in our scheduled process for linked accounts. To update the metrics values, we execute that every day as batch processing.
  2. The data got in the first step will be stored in our database at that time. Some kinds of metrics data need calculations before saving to our database.
  3. When you access the dashboard page, the required data will be collected from our database. This process needs grouping metrics data per a certain period, like per month, per year. The difference with the previous period is also calculated in this step.
  4. The collected data in step 3 will be sent to the frontend, then graphs will be drawn. When you change the filtering condition on GUI, the frontend will request the data by the new condition to the web server again.

We use Celery with Redis to manage the distributed process of collecting metrics via the APIs. Chart.js is used for drawing graphs on the frontend.

What kind of metrics we can get depends on each advertisement service. There are several types of differences, but we save them in the same format as possible in the database to make it easy to handle them.

Markers of Video Player on Recording Service

Introduction

In Recording project, we use videojs https://videojs.com/ and its 3rd party plugin markers https://github.com/spchuang/videojs-markers to play the video as well as marking the positions of narration texts in which we will play custom audios which are automatically generated with speech synthesis technologies or manually recorded by users.

nil

The goal of this post is to focus on videojs's markers plugin, how to use it and its common use cases.

Initialization

let markers = [
     {time: 9.5, text: "this"},
     {time: 16,  text: "is"},
     {time: 23.6,text: "so"},
     {time: 28,  text: "cool"}
];

video.markers({
  markers: markers
});

In above example, video is an instance of videojs object, 2 compulsory fields are time and text but you can add any additional info which you want to query later. In Recording project, we store one additional data named is_recorded to mark whether the marker already be recorded audio file for it.

Common Cases

Customize Marker Style

We can style differently between normal marker and selected marker. Each marker has style class vjs-marker and the current marker has additional style class vjs-marker-current. Based on them we can style anything we want or even add additional html code to each marker as the above screenshot.

<div data-marker-key="63e42a41-620d-44b3-b0ee-ff5617ac051d" data-marker-time="1.368872" class="vjs-marker ui-draggable ui-draggable-handle vjs-marker-current">
  <div class="cue-line">
    2
  </div>
</div>

Draggable & Update Marker's Position

We can support markers to be draggable by using draggable JS library

$(".vjs-marker").draggable({
  start: function(event, ui) {
    //Handler when marker start moving
  },
  drag: function(event, ui) {
    //Handler when marker is on move
  },
  stop: function(event, ui) {
    //Hander when marker is stopped moving
  }
});

Normally we can use start and drag functions to handle animation when marker is on moved, and when marker is stopped moving, stop function is triggered, and we will update markers info to database and update markers of the video with new positions.

player.markers.removeAll();
$('#video_video .vjs-marker').remove();
player.markers.add(markers);

nil

Marker's Most Common Events

onMarkerReached

The event will be fired when the current position of the videojs player reaches a marker position. Please be noticed that there can be a time difference and the event is not raised precisely at marker's position time. The different can be up to 0.01 second.

onMarkerClick

The event is fired when a videojs marker is clicked and you can get the data of the clicked marker through the function argument.

Page Speed Improvement of Videos on RICHKA

Like other video systems, RICHKA GUI also suffered from the slow loading of the pages because there are many images and videos.

In this post, we share the past effort that we made the page speed of video list and format list on top and edit page faster with integrating a delayed loading of video contents.

First, we introduce about videos in RICHKA GUI. There are 2 main pages:

  • TOP page:
    • show generated videos. (1)

nil

  • show template videos for selecting when creating a new video data. (2)

nil

  • EDIT page:
    • show videos and images in scenes for generating video. (3)

nil

  • show videos and images in library of video data, library of user, searching from videos and images side, capturing from other website, PDF file (4)

nil

  • show template videos for selecting another template as same as creating a new video data in TOP page (5)

nil

  • show generated video (6)

nil

  • show sample video (7)

nil

Performance Improvements

Pagination and Search

Number of videos and images are large and displaying all of them is too slow. Therefore, we limited the number of videos and images to be shown at a time.

Load the video only after loading the page

  • Except for videos and images in scenes (3), we didn't get video in loading page processing.
  • In almost of cases, we will call an Ajax for loading them.
  • The flow is:
    • After loading a page or loading popup, an Ajax will be called.
    • In the request processing, a loading page or loading icon will be displayed.
    • After response is returned, hide the loading page or loading icon, then show videos and images.

nil

Loading a limited number of videos one by one

In above improvement, in case of videos, we don't show all of them in the same time.

function loadGroupVideojs(videoItems, modal_id, after_video_loading) {
    loadVideojs(videoItems, 0, modal_id, after_video_loading);
    setTimeout(loadVideojs(videoItems, 1, modal_id, after_video_loading), 50);
    setTimeout(loadVideojs(videoItems, 2, modal_id, after_video_loading), 100);
    setTimeout(loadVideojs(videoItems, 3, modal_id, after_video_loading), 150);
    setTimeout(loadVideojs(videoItems, 4, modal_id, after_video_loading), 200);
}
function loadVideojs(videoItems, index, modal_id, after_video_loading){
    var video = videoItems[index];
    ...
	var poster = video.getAttribute('xx-poster');
	if (poster === null) {
	    if (video.getAttribute('preload') === 'none') {
		video.setAttribute('preload', 'metadata');
		addDurationTimeToVideo(video);
	    }
	}
    ...
    index += 5;
    if (index < videoItems.length) {

	setTimeout(loadVideojs(videoItems, index, modal_id, after_video_loading), 400);
    }
}

Like above code, we loaded five videos 50ms apart. When the videos have been loaded, the next videos are loaded in the end of function loadVideojs.

When all of the videos have been loaded, the recursive function call of loadVideojs ends.

nil

Use preload and thumbnail attributes in video tags

All videos in RICHKA have thumbnail images. There are 2 types of videos:

  • Normal video: only play
    • In this case, video tags will be rendered with 2 attributes: preload attribute is none and xx-poster attribute is a thumbnail
    • When videos are visible, the poster attribute will be created with xx-poster
    • When videos are played, the video contents will be loaded
  • Special video: need video information such as height, width, duration time
    • We read video information and save to the video name into database
    • When videos are rendered, we use thumbnails and use video information to crop
    • When users hover over videos, thumbnails are removed and video tags whose preload attribute is metadata are added with a style of thumbnail.

nil

FFmpeg WASM

Introduction

FFmpeg WASM is a pure WebAssembly / JavaScript port of FFmpeg. It enables video & audio record, convert and stream right inside browsers. The main Git repository for it is https://github.com/ffmpegwasm/ffmpeg.wasm

nil

Right now, in Recording process, we utilize user experience by uploading video source file directly from front-end web browser to S3 without going through any server using presigned S3 URL. The limitation of the approach is that we cannot convert the source video file as needed without going through the server (which increases a lot of waiting time for end users). Some handy cases for that needs are:

  • Unify video source format to MP4 from different video file formats (AVI, MOV).
  • Right now web browser does not support H265 video format and we need to convert to MP4 format to support playing it in web browser.

Based on the above needs, we research FFmpeg WASM library as we think that it would be nice if we can do the video conversion directly from web browser

Licensing

  • @ffmpeg/ffmpeg contains kind of a wrapper to handle the complexity of loading core and calling low-level APIs. It is a small code base and under MIT license.
  • @ffmpeg/core following the same licenses as FFmpeg and its external libraries.

How it works

  • The only JavaScript file defined in HTML file is https://unpkg.com/@ffmpeg/ffmpeg@0.9.4/dist/ffmpeg.min.js but actually it is just a wrapper.
  • Based on the actual need in our triggered ffmpeg function, the JavaScript will load ffmpeg/core file *ffmpeg-core.wasm and its JavaScript file *ffmpeg-core.js. The size of ffmpeg-core.wasm at the time of testing is 22MB.
  • Sometimes we may need to use the newest version of @ffmpeg/core and we can define it using customized path.
const ffmpeg = createFFmpeg({
  corePath: '../../../src/ffmpeg-core.js',
});

Testing example

  • In the demo below, user will have an upload button to upload source video file, which can be in either webm, MOV or H.265 MP4 format.
  • It takes several minutes to transcode and you can monitor the progress on the console of DevTool.
  • The source of the sample demo is below.
<body>
  <video id="player" controls></video>
  <input type="file" id="uploader">
  <script src="https://unpkg.com/@ffmpeg/ffmpeg@0.9.4/dist/ffmpeg.min.js"></script>
  <script>
    const { createFFmpeg, fetchFile } = FFmpeg;
    const ffmpeg = createFFmpeg({ log: true });
    const transcode = async ({ target: { files } }) => {
      const { name } = files[0];
      await ffmpeg.load();
      ffmpeg.FS('writeFile', name, await fetchFile(files[0]));
      await ffmpeg.run('-i', name,  'output.mp4');
      //await ffmpeg.run('-i', name, '-q:v', 0, 'output.mp4');
      const data = ffmpeg.FS('readFile', 'output.mp4');
      const video = document.getElementById('player');
      video.src = URL.createObjectURL(new Blob([data.buffer], { type: 'video/mp4' }));
    }

    document.getElementById('uploader').addEventListener('change', transcode);
  </script>
</body>
  • When user click upload button and select a MOV video file, FFmpeg WASM library will be called to converted it to MP4 file (output.mp4).

nil

  • User can trace the conversion status, as normal ffmpeg oss by its output in console log

nil

nil

nil

  • When the conversion is completed, JS loads HTML video tag's source with the converted video's data and display on screen.

nil

  • User flow diagram can be described as below

nil

Testing result

  • We made 4 test cases converting from different source video format to MP4 format:
    • WebM: It is successful and the conversion time is fast. For around 8MB video it took less than 2 minutes.
    • H.265: It is successful but the progress takes very long to complete, more than 6 minutes while if we do it with ffmpeg command it is just around 3 minutes. So nearly double the time.
    • General MOV file from Internet: It is successful and the conversion time is quite fast, around 2 minutes.
    • MOV file which recorded from MacOS: It is failed after few seconds using FFmpeg WASM library but it is successful using ffmpeg command.
    • General MOV file from Internet: It is successful and the conversion time is quite fast, around 2 minutes.

At the moment of writing this article, FFmpeg WASM is twice slower and unstable, but it is worth monitoring the future progress, and we may use WASM of ImageMagic in the future.

Integration Metadata into Video

Abstract

Almost of the video data consists of the binary data of video and audio streams, but the video format such as AVI(.avi), MPEG-4(.mp4) and QuickTime File Format(.mov) etc. support to embed key/value pairs of metadata into video binary because the formats have the dedicated area to embed.

The benefit to embed the metadata is to keep the application data in portable without having an external file. Even if we distribute the video file on the web, the metadata will not be lost and keep in stable. The metadata is officially standardized and general video player can understand them and no harm in the playback.

In RICHKA, we integrate some metadata into the generated videos to be available in our future applications. For examples, we integrate an id of video template used in the video generation to enable to locate even if the videos are distributed.

The keys supported by each container format are described below. Based on the format, the keys are different, but we can easily integrate with ffmpeg. https://wiki.multimedia.cx/index.php/FFmpeg_Metadata

[[nil]

Integrating metadata into Video

The sample below is to embed metadata with ffmpeg such as the name of the encoding tool, the video title and the id of video format used. We can suppress the needless transcode by simply copying video/audio streams with the options -c:a copy -c:v copy.

$ ffmpeg -y -i test.mp4 \
  -metadata encoding_tool='RICHKA' \
  -metadata description='{"format_id":"00123"}' \
  -metadata title="Sample Title" \
  -c:a copy -c:v copy out.mp4

Retrieving metadata from video

There are some Linux commands to retrieve the metadata.

The 1st option is ffprobe which is automatically installed with ffmpeg. In the output log, there is a section Metadada including the key/value pairs.

$ ffprobe out.mp4

...
  Metadata:
    major_brand     : isom
    minor_version   : 512
    compatible_brands: isomiso2avc1mp41
    title           : Sample Title
    encoder         : RICHKA
    description     : {"format_id":"00123"}
...

2nd option is to use AtomicParsley with a command option -t. It simply show the raw data of the key/value pairs.

$ AtomicParsley out.mp4 -t
Atom "©nam" contains: Sample Title
Atom "©too" contains: RICHKA
Atom "desc" contains: {"format_id":"00123"}

This is not recommended to use in general, but 3rd option is to use the powerful strings to print the sequences of printable characters in any files. The metadata was integrated into the final area in the video binary.

$ cat strings out.mp4
...
data
Sample Title
data
RICHKA
-desc
%data
{"format_id":"00123"}
...

License check by scancode-toolkit

Abstract

In this post, we introduce a method of automating the process of Python codes license scanning by using:

  • Scancode-toolkit: To perform code license scanning.
  • Jenkins: Run this test automatically based on changes of code on target branch.

Steps

Prepare environment

Before we start, make sure the system satisfy below mentioned requirements:

Create Jenkins job

From home page of Jenkins:

  • Click "New Item"
  • Enter a name of the new job, for example: "Check-License-Scan-Code"
  • Choose "Freestyle project" then click "OK" to go to next steps

nil

Configure Jenkins job

After clicking "OK" button in the previous step, we will see a GUI that contains steps to configure Jenkins job. We will go over step by step.

  • In "General" step, we should add a description for this Jenkins job and configure log rotation to prevent too many logs.

nil

  • In "Source Code Management" step, you have to do following actions:
    • Enter your repository (From GitHub, GitLab, Bitbucket, Backlog, .etc)
    • Add credentials that can pull codes from a remote branch and select it.
    • Provide a branch that you want to check (In this example, I want to scan stage branch).

Besides, there are many other additional behaviors that you can add more. For example, your project has submodules and need to scan them as well, you can add "Advanced sub-modules behaviors" and do configure. Our project has sub-modules so I added this behavior and do recursively.

nil

  • In "Build Triggers" step, there are many options that you can run this job but I will choose "Poll SCM". This will allow me to configure to run this job like a crontab in Linux system. For example, I will run this job once an hour (Using Poll SCM then the job will run if there is a new change of code only). In "Build Environment" step, you can choose some options for building like "Delete workspace before build starts", Add timestamps to the Console Output", .etc. It's up to you. My suggestion is that you should add "Add timestamps to the Console Output" then you can know the build time when checking the output log again.

nil

  • "Build" step: Because I installed bandit on Jenkins server, so I will choose "Execute shell" for this step. I will use bandit to scan all source folder from git repository and try to find if there is any "High Severity" item. If there is any item, I will use "exit 1" to mark that this build is failed. Otherwise, the build is success. Then we can use "Post-build Actions" to define response actions with each type of status.

Here is content of script that I will run:

#!/bin/bash
target_dir=./source
result_dir=license-check-result
mkdir -p $result_dir
export LD_LIBRARY_PATH=/usr/lib64
/home/jenkins/toolkits/scancode-toolkit-3.1.1/scancode --license --copyright --summary-with-details --processes 2 --json-pp $result_dir/result.json --html $result_dir/result.html $target_dir
parsed_file="$result_dir/result1.json"
JSON=`cat $result_dir/result.json`
echo $JSON | tr '\r\n' ' ' | jq '.files[].licenses[].matched_rule.licenses | join(",")' > $parsed_file

gpl="gpl"
invalid_license_count=0

while IFS= read line
do
	licenses=$(echo $line | sed "s/\"//g" | tr "," "\n")
	sub_license_valid_count=0
	for license in $licenses
	do
	    if [[ "$license" !=  *"$gpl"* ]]; then
		sub_license_valid_count=$((sub_license_valid_count+1))
		break
	    fi
	done
	if [[ $sub_license_valid_count == 0 ]]; then
		invalid_license_count=$((invalid_license_count+1))
	fi
done <"$parsed_file"


if [ $invalid_license_count -gt 0 ];then
    exit 1
else
    exit 0
fi

nil

"Post-build Actions" will support us to define actions that we want to do when the build is failed. There are many actions that we can choose. Following my opinion, I mostly use "E-mail Notification" then I will know when this job is failed to check and make it works as it should be. All's done! Now you can click "Save" and then click "Build Now" to build this job. If it's failed, you can go to the failed build and check "Console Output" to find out the reason and fix this. Otherwise, you can sleep well because there is no high severity issues on your code.

Here is an example of an output that you can see on "Console Output" on a build item (You can see it when the job is running, it will be loaded in real-time).

nil

Thanks for your reading to the end of this post!

Find Security Issues With Bandit

Abstract

In this post, we introduce a method of automating the process of code review of Python codes by using:

  • Bandit: To perform code review & find security issues of Python codes.
  • Jenkins: Run this test automatically based on changes of code on target branch.

Steps

Prepare environment

Before we start, make sure the system satisfy below mentioned requirements:

  • Python2.7/Python3 installed
  • Git & pip configured
  • Jenkins servers installed & configured
  • Identify git branch for code scanning
  • Install bandit tool (See guide from https://github.com/PyCQA/bandit)

Create Jenkins job

From home page of Jenkins:

  • Click "New Item"
  • Enter a name of the new job, for example: "Security-Issues-Scanner"
  • Choose "Freestyle project" then click "OK" to go to next steps

nil

Configure Jenkins job

After clicking "OK" button in the previous step, we will see a GUI that contains steps to configure Jenkins job. We will go over step by step.

  • In "General" step, we should add a description for this Jenkins job and configure log rotation to prevent too many logs.

nil

  • In "Source Code Management" step, you have to do following actions:
    • Enter your repository (From GitHub, GitLab, Bitbucket, Backlog, .etc)
    • Add credentials that can pull codes from a remote branch and select it.
    • Provide a branch that you want to check (In this example, I want to scan stage branch).

nil

There are many other additional behaviors that you can add more. For example, your project has submodules and need to scan them as well, you can add "Advanced sub-modules behaviors" and do configure. Here is list most behaviors that you can add:

nil

  • In "Build Triggers" step, there are many options that you can run this job but I will choose "Poll SCM". This will allow me to configure to run this job like a crontab in Linux system. For example, I will run this job once an hour (Using Poll SCM then the job will run if there is a new change of code only).

nil

  • In "Build Environment" step, you can choose some options for building like "Delete workspace before build starts", Add timestamps to the Console Output", .etc. It's up to you. My suggestion is that you should add "Add timestamps to the Console Output" then you can know the build time when checking the output log again.
  • "Build" step: Because I installed bandit on Jenkins server, so I will choose "Execute shell" for this step. I will use bandit to scan all source folder from git repository and try to find if there is any "High Severity" item. If there is any item, I will use "exit 1" to mark that this build is failed. Otherwise, the build is success. Then we can use "Post-build Actions" to define response actions with each type of status.

Here is content of script that I will run:

bandit -r ./source 2>&1 | tee ./out.log
num=`grep "Severity: High" ./out.log | wc -l`
if [ $num -eq 0 ]; then
exit 0
else
exit 1
fi

nil

  • "Post-build Actions" will support us to define actions that we want to do when the build is failed. There are many actions that we can choose:

nil

With my opinion, I mostly use "E-mail Notification" then I will know when this job is failed to check and make it works as it should be. All's done! Now you can click "Save" and then click "Build Now" to build this job. If it's failed, you can go to the failed build and check "Console Output" to find out the reason and fix this. Otherwise, you can sleep well because there is no high severity issues on your code.

Here is an example of an output that you can see on "Console Output" on a build item (You can see it when the job is running, it will be loaded in real-time).

nil

Thanks for your reading to the end of this post! I also want to thank "Digital Varys" with meaningful preview image!

RICHKA Web API

Abstract

RICHKA provides two interfaces with GUI and Web API to enables users to easily create video data with setting images, videos and texts and generating videos. In this post, we describe the Web API whose architecture conforms to the general REST architecture. It enables users to integrate the primary features of RICHKA into their systems such as smartphone application to generate videos with using the photo album.

The main functions of Web API are below, and they are built with Django REST Framework.

  • Authenticate API clients and publish API tokens
  • Get list of projects/videos
  • Create projects / videos
  • Set images / videos / texts to scenes of videos
  • Generate video files

The basic sequence diagram to generate videos is below.

nil

Client Authentication

To call Web API, API clients need to set tokens TOKEN_AUTH in every request. The tokens are published with sending HTTP POST to /api/v1/api-token-auth/ with the account information. API clients should store the tokens into their database to suppress this API call every time.

curl -X POST https://API_HOST/api/v1/accounts/login/ \
     -H 'Content-Type: application/json' \
     -d '{
       "email": "USER_EMAIL",
       "password": "USER_PASSWORD"
     }'

Create New Project

A new project directory is created with sending HTTP POST to /api/v1/projects/ as below.

curl -X POST https://API_HOST/api/v1/projects/ \
     -H 'Authorization: Token TOKEN_AUTH' \
     -H 'Content-Type: application/json' \
     -d '{
       "name": "New Project",
       "is_shared": true
     }'

The ID of the created project PROJECT_ID is returned to the clients. The detail information of the project can be obtained with sending HTTP GET to /v1/projects/PROJECT_ID/.

Get a list of video templates

API clients can get a list of available template IDs TEMPLATE_ID with sending HTTP GET to /api/v1/template_groups/.

curl -X GET https://API_HOST/api/v1/template_groups/ \
     -H 'Authorization: Token TOKEN_AUTH' \
     -H 'Content-Type: application/json'

Create New Video Data

A new video data is created with sending HTTP POST to /api/v1/videos/ with specifying the created project id PROJECT_ID and the selected video template TEMPLATE_ID. The ID of the created video data VIDEO_ID is returned to the clients.

curl -X POST https://API_HOST/api/v1/videos/ \
     -H 'Authorization: Token TOKEN_AUTH' \
     -H 'Content-Type: application/json' \
     -d '{
       "name": "your video title",
       "project_id": "PROJECT_ID",
       "template_id": TEMPLATE_ID
     }'

Set Images / Videos / Texts into Scenes

nil

For 1st step, API clients need to upload the image/video files to be available in the video data with VIDEO_ID. Then IMAGE_NAME_1 and IMAGE_NAME_2 are returned to the clients.

curl -X POST https://API_HOST/api/v1/videos/VIDEO_ID/images/ \
     -H 'Authorization: Token TOKEN_AUTH' \
     -H 'content-type: multipart/form-data; boundary=----WebKitFormBoundary7MA4YWxkTrZu0gW' \
     -F 'files[]=@/path/to/image/1.png' \
     -F 'files[]=@/path/to/image/2.jpeg'

After uploading the file contents, API clients can set the images into scenes of the video data with using the identifiers IMAGE_NAME_1 and IMAGE_NAME_2.

curl -X PUT https://API_HOST/api/v1/videos/VIDEO_ID/ \
  -H 'Authorization: Token TOKEN_AUTH' \
  -H 'Content-Type: application/json' \
  -d '{
    "name": "New video'\''s name",
    "bgm_file": BGM_ID,
    "memo": "New Memo",
    "slides": [
	{
	    "index": 0,
	    "text": "テキスト",
	    "image_name": "IMAGE_NAME_1"
	},
	{
	    "index": 1,
	    "text": "テキスト",
	    "image_name": "IMAGE_NAME_2"
	}
    ]
}'

Generate Videos

nil

After the scenes have been set up, API clients can request to start the video generation with video servers.

curl -X POST https://API_HOST/api/v1/videos/VIDEO_ID/generate/ \
     -H 'Authorization: Token TOKEN_AUTH' \
     -H 'Content-Type: application/json'

When the video generation has been done, a Webhook URL registered in the account setting page beforehand will be called back with sending VIDEO_ID.

{
  video_id: VIDEO_ID,
  user_id: xxxxx,
  time: 2020-01-01 01:02:03,
  webhook_id: 1234,
  type: webhook
}

Download Video Contents

API clients can get the downloadable S3 URLs with sending HTTP GET with /api/v1/videos/VIDEO_ID/.

curl -X GET https://API_HOST/api/v1/videos/VIDEO_ID/ \
     -H 'Authorization: Token TOKEN_AUTH' \
     -H 'Content-Type: application/json'

Our Git Habit of Narration Recording project

Abstract

We released a new web application called ナレ撮り which enables users to record the voice as narration on web browsers and combine them with video sources and generate videos in last month. In this post, we introduce our daily Git habit how to handle multiple branches to add new features and release official versions and hotfix releasing for bug fixing as professional development.

Our development team refers to a good article of Git Workflow and the format of commit log of AngularJS guys.

nil

Branches

Feature branches

When you develop new features or fix bugs and the total modified lines will be relatively larger compared with prior ones you developed, then you should create new branches and merge after finishing the developments as general Git culture.

Stage branch

It is a primary development branch and feature branches will be merged to stage branch after successfully tested and reviewed.

This branch is a head of any other branches, but there is a possibility any degrade happens with merging the working branches into this branch. Therefore we can't release this branch as official version right now.

Release branches

  • On each release, we create a new release branch based on latest stage branch for both recording and video repositories (even though there may not have any changes since last release for one repository).
  • The release branch should be named as release/[VERSION_NUMBER].
  • Sometimes a hotfix releasing is needed and we can apply hotfix commits to the release branches

nil

Tags

Tags are created with the release branches of both recording and video repositories after the final reviewing the release has been successfully passed.

nil

Commit logs

We apply 3rd party knowledge for the format of commit logs from AngularJS guys. We follow the tiny rule in the article as below.

<type>(<scope>): <subject>

Type : Must be one of the following:

| Type     | Meaning                                                                                                |
|----------+--------------------------------------------------------------------------------------------------------|
| feat     | A new feature                                                                                          |
| fix      | A bug fix                                                                                              |
| docs     | Documentation only changes                                                                             |
| style    | Changes that do not affect the meaning of the code (white-space, formatting, missing semi-colons, etc) |
| refactor | A code change that neither fixes a bug nor adds a feature                                              |
| perf     | A code change that improves performance                                                                |
| test     | Adding missing or correcting existing tests                                                            |
| chore    | Changes to the build process or auxiliary tools and libraries such as documentation generation         |

For examples, our commit logs would be below.

fix(gui): Fixed file uploading. Refs #REC-XXX
fix(video): Make ffmpeg video generation more stable. Refs #REC-XXX
test(django): Added new tests for admin contract page. Refs #REC-XXX
feat(gui) : Added Narration script function. Refs #REC-XXX 

Utilize special keywords in commit logs

When we commit, we fill understandable commit logs and use special keywords such as Refs #TICKET_NUMBER to make the references with the corresponding tickets. Therefore before committing, we create tickets at first and make the references with the commit logs.

Rules for merging

When we merge branches, we have a rule to add "–no-ff" as command option to suppress fast-forward of the default behavior of Git.

For examples: git merge --no-ff feature/REC-00

Modification of DB models

When we modify the models of Django with development tasks, we do that on stage branch at first. We sometimes encountered DB migration issue on stage branch and it also caused runtime issues on our individual working branches. To prevent from happening the same issue, we applied a simple work flow to modify DB models only on stage branch.

  1. If you need to modify models of Django, checkout stage branch at first
  2. Modify the models and execute migration against staging DB
  3. Merge stage branch into your working branches

Emacs modeline enhancement for Git diff

Abstract

Emacs has a built-in function vc-mode to work with version control systems such as CVS, Subversion, Git and so on. It enables to show diff / commit logs and commit codes without working with the dedicated commands on terminal applications. For Git, we can operate general git commands such as status / log / diff / checkout / commit / push. The screenshot below is a sample of vc-diff command to show git diff.

In this post, a utility function to enhance vc-diff command for Git is introduced with changing the behavior of the internal function of vc-git.el and improve the modeline for efficient coding.

nil

Show the numbers of diff lines on modeline

When we open a file on Emacs tracked by Git, the branch name is shown on the modeline. This build-in feature is enabled by a lisp function vc-git-mode-line-string below defined in vc-git.el. We will extend the build-in behavior with defadvice to show the numbers of diff lines on modeline.

+---[/usr/share/emacs/26.3/lisp/vc/vc-git.el.gz:339]
| (defun vc-git-mode-line-string (file)
|   "Return a string for `vc-mode-line' to put in the mode line for FILE."
|   (let* ((rev (vc-working-revision file 'Git))
|          (disp-rev (or (vc-git--symbolic-ref file)
|                        (substring rev 0 7)))
|          (def-ml (vc-default-mode-line-string 'Git file))
|          (help-echo (get-text-property 0 'help-echo def-ml))
|          (face   (get-text-property 0 'face def-ml)))
|     (propertize (concat (substring def-ml 0 4) disp-rev)
|                 'face face
|                 'help-echo (concat help-echo "\nCurrent revision: " rev))))
+---

To show the information of git diff, we can get each number of added/deleted lines with using git diff –numstat – FILE_NAME. An sample output with the command is below and the 1st column is the numbers of lines added to files and the 2nd one is the ones of deleted lines. If we execute with specifying a filename, we can get only for the file.

$ git diff --numstat --
7       6       .bashrc
2       1       .bashrc-common
34      9       .emacs
1       0       .folders
4       4       .ssh/config-home
5       1       emacslib/.aspell.en.pws
4       3       emacslib/meeting-dev.template
2       2       emacslib/my-edit.el
108     11      emacslib/my-org.el
4       60      emacslib/my-wl.el
101     55      emacslib/wl-common.el

The lisp function below is the final output of the utility function. The number of added lines is shown with green3 and the one of deleted lines is shown with a color predefined by font-lock-warning-face. If there is no diff on the opened file, "✔" is shown.

(defadvice vc-git-mode-line-string (after plus-minus (file) compile activate)
  "Show the information of git diff on modeline."
  (setq ad-return-value
	(concat (propertize ad-return-value 'face '(:foreground "white" :weight bold))
		" ["
		(let ((plus-minus (vc-git--run-command-string
				   file "diff" "--numstat" "--")))
		  (if (and plus-minus
		       (string-match "^\\([0-9]+\\)\t\\([0-9]+\\)\t" plus-minus))
		       (concat
			(propertize (format "+%s" (match-string 1 plus-minus)) 'face '(:foreground "green3"))
			(propertize (format "-%s" (match-string 2 plus-minus)) 'face '(:inherit font-lock-warning-face)))
		    (propertize "✔" 'face '(:foreground "green3" :weight bold))))
		"]")))

As a screenshot below, the diff information is shown on modeline with the branch name.

nil