The prototype of Morphing

Abstract

In this post, we introduce HyperMorph on HTML5 that allow us to create motions of objects and then export these motions into video files.

Definitions

Morphing

Morphing is a special effect in motion pictures and animations that change (or morphs) one image or shape into another through a seamless transition. Traditionally such a depiction would be achieved through dissolving techniques on film. Since the early 1990s, this has been replaced by computer software to create more realistic transitions. A similar method is applied to audio recordings in similar fashion, for example, by changing voices or vocal lines.

Source: https://en.wikipedia.org/wiki/Morphing

HyperMorph

There are many terminologies on HyperMorph that you can check on https://blog.altair.co.kr/wp-content/uploads/2011/03/hypermorph.pdf.

Within this post, we just define a simple definition about HyperMorph on video generation. It is a set of points from a 1st image and a corresponding set of points from a 2nd image. A special effect will change two sets together and makes the 1st image become the 2nd image and vice versa. When we define enough of points, it will be able to create very smooth video.

How to create HyperMorph from two images with HTML & JavaScript

  • Define the set of points on the 1st image and a corresponding set of points from 2nd image.
  • Using HTML5 canvas to draw a shrink image based on moving points between two sets and merge two images.

nil

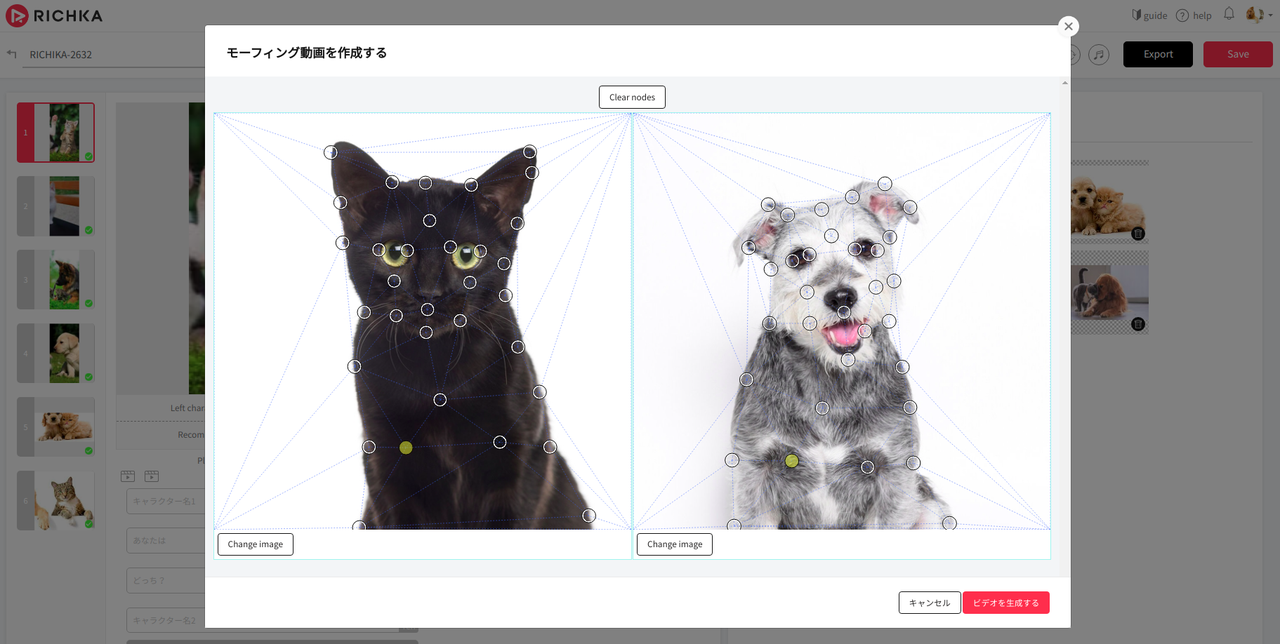
  • With each moving step, capture the image on the canvas and add it as a frame of a video.
  • When capture enough frames of a video, we can export these frames into a video file.

And here is the output video (I converted to GIF file to display here easily):

nil

Using Sentry to debug JavaScript in the RICHKA front end

Abstract

Sentry is a service that helps you to monitor and fix crashes in realtime. Sentry has many official Sentry SDKs such as: JavaScript, React-Native, Python, Ruby, PHP, Go, Rust, Java, Objective-C/Swift, C#, Perl, Elixir, Laravel. In this post, we describe our usage of Sentry for JavaScript to debug RICHKA front end. After using Sentry for a while, we see a lot of bugs in production environment. Information is quite detailed so it's easy to address. I rate it very useful to debug in front end.

General usage of Sentry JavaScript

  1. First of all, we need to create Sentry account and create Project to debug. We can see debug logs in Sentry account 15-60 seconds after events occurred. Because Sentry account can join many organizations and many Projects so Sentry debug logs can be shared to all of developers.
  2. In separated logs, we can assign to specific developers and comment, set statuses.
  3. Because RICHKA Project developed by Django and Python, we configure Sentry JavaScript as base template. In Sentry account management, we can see a configuration or we can see a common JavaScript configuration in here
  4. Sentry integrates many third software : Slack, Git, GitLab, JIRA, Microsoft team, … RICHKA developers discuss in Slack so we integrated Sentry to Slack.

Here are some examples.

nil

nil

Integration between Sentry debug and Slack

  1. Create a new channel in Slack.
  2. Access Sentry project and Settings > Integrations > Slack and login Slack account.
  3. Assign a channel to report debug logs.

nil

If a debug event occurs, Sentry server will send a post to the channel. Developers can easily track them. Note: if there're a lot of events, we need to configure number of posts in a channel.

Customize data in debug log

Because the size of the data sent to Sentry server is limited and length of additional data in Sentry log is too. So we need to create a function to split data.

function sentry_capture_message(data, extra, message) {
    Sentry.withScope(scope => {
	if (Array.isArray(data))
	{
	    let i = 0;
	    for (let datum of data){
		if (typeof datum == 'string') {
		    if (datum.length >= 16000 && datum.length <= 1024 * 1024) {
			let stringArray = datum.split('\n');
			for (let j = 0; j < stringArray.length; j++) {
			    if (stringArray[j].trim().length > 0) {
				i++;
				scope.setExtra(extra + sprintf("%04d",i), stringArray[j]);
			    }
			}
		    }
		}
		else {
		    scope.setExtra(extra + sprintf("%04d",i), datum);
		    i++;
		}
	    }
	}
	else scope.setExtra(extra, data);
	Sentry.captureMessage(message);
    });
}

For example about a target function to debug:

function deleteSearchKeyword(data_id){
    if($('#stock-video > .stock_list > li.video').length > 0){
	$('#stock-video > .stock_list > li.video').each(function(i, elem){
	    let src = $(elem).find('p span video').attr('src');
	    if(!src || src.endsWith('/static/')){
		$(elem).remove();
	    }
	});
	$('div#stock-video > div.stock_title').hide();
	$('.stock_more').hide();
    }
    if ($('#stock-photo > .stock_list').length > 0 || $('#stock-video > .stock_list').length > 0) {
	var materials_id = [];
	$.each($('.materialIndex'), function(i,v) {
	    materials_id.push($(v).val());
	});
	var el = $('.delete-keyword');
	$.ajax({
	    'url': '/delete_material_when_redirect',
	    'type': 'POST',
	    'data': {
		'video_data_id': data_id,
		'materials_id': materials_id
	    },
	    'dataType': 'json',
	    'async': true,
	    'success': function (response) {
		if (!response.result) {
		    console.warn('削除中にエラーが発生しました : deleteSearchKeyword');
		    sentry_capture_message([data_id, response], 'response', `Delete Material When Redirect Error`);
		}
	    },
	    'error': function(err) {
		sentry_capture_message([data_id, err.responseText], 'response', `Delete Material When Redirect Error`);
	    }
	});
    }
}

Here are some of the results after customization. The logs with prefix response0000, response0044 - response0054 are the ones split by our custom JavaScript function sentry_capture_message.

nil

nil

Released Narration Recording Service

Abstract

Some RICHKA users requested that they would like to input their narration into the videos and recently we released a new web application called ナレ撮り which enables users to record the voice as narration on web browsers and combine them with video sources and generate videos. And synthesis of speech technology to automatically generate voice data with the input texts is also supported as AI narration mode and users don't have input voice.

The screenshot below is the sample of the edit page. The upper left is a dedicated video player to playback both a video source and recorded narration with combining them. Users can edit the start time of cues with dragging the cue point on the seek bar. When users click the recording button in the lower left, the input voice is recorded through WebRTC and it is converted to MP3 on the web browsers. The right side is the narration texts users can add/edit. In the AI narration mode, the voices are generated with the texts.

After the recording has been done, users click the generation button in the upper right and it starts to generate a video with combining the video source and the recorded voices.

nil

Development Environment

Web servers are based on Django, and additional 8 Python packages such as Django extensions and boto3 to publish pre-signed S3 URL and WebVTT parser are integrated. The current total lines of Django is around 3000 and it is still quite small because it is still beta version. Regarding the front end, 20 OSS libraries such as jQuery, videojs, videojs marker, RecordRTC etc. are integrated. The current total lines of JavaScript codes is around 4300 and the font end is also still quite small.

This product is still beta, and based on the feedback from users, new advanced features will be continuously added and this project will also become big service soon such as RICHKA. Regarding the synthesis of speech technology, we will make a new post and share the detail.

nil

Voice Recording

One of primary features is to record voice per cue point inputted with the mic. When users click the recording button, the recording processing is executed with using WebRTC as a diagram below.

  1. A user clicks the recording button and records the voice with mic
  2. The voice data is retrieved with WebRTC API and converted into MP3 in JavaScript layer. Then it is directly uploaded to S3 with pre-signed S3 URL.
  3. To enable the user to listen the recorded voice, our dedicated video player on JavaScript layer loads the record and initialize to be ready.
  4. The user can playback the video source with overlaying the recorded voices without generating a new video on the dedicated video player.

nil

Direct Conversion to MP3 on JavaScript layer

At the 1st step, the MIME type of the audio data retrieved by WebRTC is audio/webm in default and it tended to be large data size and the quality of the voice is a bit higher quality. To adjust the quality and the data size to match our requirements, we decided to use a JavaScript library RecordRTC to directly convert to MP3 on JavaScript layer and upload to S3 without delegating the conversion processing to servers and Lambda. After we obtain the binary of MP3, we don't convert to other formats in the data life cycle. The client processing makes the architecture simpler and doesn't cause any additional load to the server side.

Dedicated video player to sync video and voices

At the 3rd step, we implemented a dedicated video player to playback the video source with overlaying the recorded voices without generating another video. The advantage is users can immediately check the recording results without waiting for several seconds to generate new videos. The dedicated video player has internally two players to playback with synchronizing the video source and the recorded voices.

When the current seek point reaches the next cue point, the video player loads the corresponding voice data from S3 and make the video player ready to play.

Video Generation

After users have inputted the voices to cue points, user are ready to generate videos with overlying recorded voices. The generated ones can be downloaded as independent video file.

When users click the generation button, the generation process is executed on one of dedicated video servers as steps below.

  1. When a user click the generation button, an HTTP POST request is sent to one of web servers behind of a load balancer.
  2. The web server retrieves the location of the corresponding voices of S3 and sends an HTTP request to one of video servers.
  3. The video server downloads the video source and the recorded voice files from S3, and generate an MP4 video with overlying the voices over the video source with using ffmpeg.
  4. The video server uploads the generated video to S3 with pre-singed S3 URL.

nil

At 3rd step to generate the video, the simplified sample command of ffmpeg is like below.

Each recorded voice stream is overlaid over the audio stream of the video source with amerge command to multiplex.

And they are concatenated into one audio stream with concat command as "[m1][s1][m2][s2][m3][m4][s3]concat=n=7:v=0:a=1[out]" in the filter_complex option.

To keep the original video stream of the video source, the video stream is directly copied to the output stream with enabling stream copy mode with -c:vcopy option. It can avoid needless encoding of video stream and suppress CPU usage, therefore this command can be rapidly done.

ffmpeg -i 'vide_source.mp4'
-i 'voice_1.mp3'
-i 'voice_2.mp3'
-i 'voice_3.mp3'
-i 'voice_4.mp3'
-filter_complex '[0:a]atrim=start=0.0:duration=1.87,aformat=sample_fmts=fltp:sample_rates=44100:
channel_layouts=stereo,volume=1,asetpts=PTS-STARTPTS[sm1];[0:a]atrim=start=1.87:duration=0.63,
aformat=sample_fmts=fltp:sample_rates=44100:channel_layouts=stereo,volume=1,asetpts=PTS-STARTPTS[s1];
[0:a]atrim=start=2.5:duration=1.44,aformat=sample_fmts=fltp:sample_rates=44100:channel_layouts=stereo,
volume=1,asetpts=PTS-STARTPTS[sm2];[0:a]atrim=start=3.94:duration=1.56,aformat=sample_fmts=fltp:
sample_rates=44100:channel_layouts=stereo,volume=1,asetpts=PTS-STARTPTS[s2];[0:a]atrim=start=5.5:
duration=2.0,aformat=sample_fmts=fltp:sample_rates=44100:channel_layouts=stereo,volume=1,
asetpts=PTS-STARTPTS[sm3];[0:a]atrim=start=7.5:duration=1.82,aformat=sample_fmts=fltp:sample_rates=44100:
channel_layouts=stereo,volume=1,asetpts=PTS-STARTPTS[sm4];[0:a]atrim=start=9.32,aformat=sample_fmts=fltp:
sample_rates=44100:channel_layouts=stereo,volume=1,asetpts=PTS-STARTPTS[s3];[sm1][1:a]amerge[m1];
[sm2][2:a]amerge[m2];[sm3][3:a]amerge[m3];[sm4][4:a]amerge[m4];[m1][s1][m2][s2][m3][m4][s3]concat=n=7:v=0:a=1[out]'
-c:v copy -map 0:v -map [out] 'out.mp4'

The figure below represents how merging and concatenating audio streams work with the ffmpeg command. The concatenated audio stream is accumulated into an output stream [out] in the command. Then, it is combined with the video stream of the video source with -c:v copy -map 0:v -map [out] and the final result is serialized into a file out.mp4.

nil

Web Workers API

Abstract

In this post, we describe Web Workers API which was introduced in 2010 as one of HTML5. The technology is based on fork to create a new sub process and Web Workers API enables web applications to fork an independent worker process in JavaScript world. The worker process has its own memory space and the parent main process isn't affected even if the forked process is crashed as general process system.

The practical use case is Slack that a dedicated worker process gets the notification from the server side. The worker process starts to run when we open on web browsers and it continues to stay until we close the browser tabs.

nil

Architecture of Web Workers API

The usage of Web Workers API is to communicate between a main process and a worker process with using Worker.prototype.postMessage(message, [transfer]) and worker.onmessage handler. The data sent by postMessage() is internally converted into string data and passed into the worker processes. The onmessage() of receiver side is called back with the posted data.

MDN : https://developer.mozilla.org/en-US/docs/Web/API/Web_Workers_API

+--------------+ postMessage()      onmessage() +-------------------+
|              |------------------------------->|                   |
|   main.js    | onmessage()      postMessage() |     worker.js     |
|              |<-------------------------------|                   |
+--------------+                                +-------------------+
       |
       |
+--------------+
|   main.html  |
+--------------+

Implicit Side effect

The general use case is to fork tiny processes running for a long time whose CPU loads are small as general resident application as Slack. However, we need to carefully consider the use cases before actually using on production because the load of CPU and consumed memory may not be small. The fork processing also consumes CPU resource because it take time to allocate its own memory. In addition, we should carefully consider the frequency to communicate between the main process and the worker process because frequent communication increases the load of CPU. The data sent between them is internally converted into string data because the memory space is different and it is impossible to refer to an address of an object of another process.

It is easy to use Web Worker API, but the developers should understand the heavy load of internal processing and the background of independent memory spaces. Otherwise, your web applications would encounter serious issues of low performance and high CPU usage.

#1 Sample program the worker process sends newly found prime

A 1st sample program is to delegate a dedicated process which continues to find prime numbers in the worker process and send to the main process. The sequence diagram between main and worker process is below.

nil

The source code of main process is below. A worker object is instantiated with specifying the source file "basic.js" of the worker process. Then the worker process is internally forked and starts to run. Then, CPU usage is increased in this timing. Therefore, it is good strategy to delay the timing to fork until the dedicated process is actually needed for better performance.

When the worker process finds a new prime, the worker.onmessage(event) of main process is called back and the prime data can be retrieved with event.data.

In this sample program, the worker process continues to find new prime numbers forever, therefore we need a stop button to terminate the worker process with using worker.terminate().

<!doctype html>
<html lang="ja">
  <head>
    <meta charset="utf-8">
    <title></title>
    <script type="text/javascript" src="https://code.jquery.com/jquery-1.9.1.min.js"></script>
  </head>
  <body>
    <button id="start">Start</button>
    <button id="stop">Stop</button>
    <div id="console"></div>

    <script type="text/javascript">
     var worker = null;

     $('#start').on('click', function() {
	 // fork a worker process
	 worker = new Worker('basic.js');
	 // callback hander to receive data from worker process
	 worker.onmessage = function (event) {
	     $('#console').text(event.data);
	 };
     });
     $('#stop').on('click', function() {
	 worker.terminate();
     });
    </script>
</body>
</html>

The source code of worker process is below. When it finds a new prime, it sends with postMessage() to the main process.

var n = 1;
search: while (true) {
    n += 1;
    for (var i = 2; i <= Math.sqrt(n); i += 1)
	if (n % i == 0)
	    continue search;
    // Send a prime to main process !
    postMessage(n);
}

Demo

#2 Sample program the worker process applies image filer

The 2st sample program is to delegate image filter processing to a worker process. The main process sends the pixel data of image files to the worker process. The filter result is sent back to the main process and it is rendered onto the canvas.

The sequence diagram between main process and web worker is below.

nil

The source code of the main process is below. The main process sends the pixel data of a selected image to the worker process with postMessage().

<!doctype html>
<html lang="ja">
  <head>
    <meta charset="utf-8">
    <title></title>

    <!-- JavaScript Start -->
    <script type="text/javascript" src="https://code.jquery.com/jquery-1.9.1.min.js"></script>
    <!-- JavaScript End -->
  </head>
  <body>
    <div id="console"></div>
    <p>
      <label>
	Type an image URL to decode
	<input type="url" id="image-url" list="image-list">
	<datalist id="image-list">
	  <option value="http://localhost/~uchida/study/lottie-web/samples/output2/images/img_2.png">
	  <option value="http://localhost/~uchida/study/lottie-web/samples/output2/images/img_0.png">
	</datalist>
      </label>
    </p>
    <p>
      <label>
	Choose a filter to apply
	<select id="filter">
	  <option value="none">none</option>
	  <option value="grayscale">grayscale</option>
	  <option value="brighten">brighten by 20%</option>
	</select>
      </label>
    </p>

    <div id="output"></div>
    <script type="module">
     // init a web worker
     const worker = new Worker("worker.js", { type: "module" });
     worker.onmessage = receiveFromWorker;

     const url = document.querySelector("#image-url");
     const filter = document.querySelector("#filter");
     const output = document.querySelector("#output");

     url.oninput = updateImage;
     filter.oninput = sendToWorker;

     let context, imageData;

     function updateImage() {
	 const img = new Image();
	 console.log(url.value);
	 img.src = url.value;
	 img.onload = () => {
	     output.innerHTML = "";
	     var canvas = document.createElement("canvas");
	     canvas.width = img.width;
	     canvas.height = img.height;

	     context = canvas.getContext("2d");
	     context.drawImage(img, 0, 0);
	     imageData = context.getImageData(0, 0, canvas.width, canvas.height);
	     console.log(imageData);

	     sendToWorker();
	     output.appendChild(canvas);
	 };
     }
     // send the pixel data to worker process
     function sendToWorker() {
	 worker.postMessage({imageData, filter: filter.value });
     }
     // called back by worker process
     function receiveFromWorker(e) {
	 console.log(e);
	 context.putImageData(e.data, 0, 0);
     }
    </script>
</body>
</html>

The source codes of worker process are below. It receives the pixel data with being called back with onmessage(). When the worker process has applied image filters, it sends back to main process with sending postMessage().

worker.js whose role is to communicate with the main process.

import * as filters from "./filters.js";

self.onmessage = (e) => {
    console.log(e.data);
    const { imageData, filter } = e.data;
    filters[filter](imageData);
    self.postMessage(imageData, [imageData.data.buffer]);
};

filter.js whose role is to apply image filters.

export function none() {}

export function grayscale({ data: d }) {
  for (let i = 0; i < d.length; i += 4) {
    const [r, g, b] = [d[i], d[i + 1], d[i + 2]];

    // CIE luminance for the RGB
    // The human eye is bad at seeing red and blue, so we de-emphasize them.
    d[i] = d[i + 1] = d[i + 2] = 0.2126 * r + 0.7152 * g + 0.0722 * b;
  }
};

export function brighten({ data: d }) {
  for (let i = 0; i < d.length; ++i) {
    d[i] *= 1.2;
  }
};

Demo

Improvement of Git commands with fzf

nil

Abstract

We manage source codes with Git in development projects. In general, when we check the branches, we use a git branch command below to find the candidate and we retrieve the branch with git checkout in later step. Or we directly checkout a branch when we know the name beforehand.

$ git branch
  bug/RICHIKA-1178
  bug/RICHIKA-2234
  bug/RICHIKA-2510
  feature/RICHIKA-1141
  feature/RICHIKA-1143
  feature/RICHIKA-1155
  feature/RICHIKA-1364
  feature/RICHIKA-1390
  ...
$ git checkout feature/RICHIKA-1155

This post describes a utility shell script to assist the Git command operations with fzf command such as git branche, git checkout and git log.

General usage of fzf

fzf is a powerful Linux command and enables interactive filtering which can be used for any purpose with receiving stdout of any commands.

nil

The fzf command is packaged in major Linux distributions. For Ubuntu, it can be installed by apt command.

sudo apt install fzf

For examples of the usage of fzf, I interactively find files under a specified directory with filtering parts of the file path as blow. And it can show a preview window which we can customize what kind of data is shown. In this sample, I showed the syntax highlighted content of the selected file. This command may be described on another post as well.

nil

Filtering Git branches by fzf

There are three commands below.

| Command     | Feature                              |
|-------------+--------------------------------------|
| git-br-fzf  | Filtering Git branches               |
| git-co-fzf  | Checkout with filtering Git branches |
| git-log-fzf | Filtering Git commit logs            |

The shell script combining git + fzf to assist Git operations is below. The dependent command is only fzf.

is_in_git_repo() {
    # git rev-parse HEAD > /dev/null 2>&1
    git rev-parse HEAD > /dev/null
}
# Filter branches.
git-br-fzf() {
    is_in_git_repo || return

    local tags branches target
    tags=$(
	git tag | awk '{print "\x1b[31;1mtag\x1b[m\t" $1}') || return
    branches=$(
	git branch --all | grep -v HEAD |
	    sed "s/.* //" | sed "s#remotes/[^/]*/##" |
	    sort -u | awk '{print "\x1b[34;1mbranch\x1b[m\t" $1}') || return
    target=$(
	(echo "$tags"; echo "$branches") |
	    fzf --no-hscroll --no-multi --delimiter="\t" -n 2 \
		--ansi --preview="git log -200 --pretty=format:%s $(echo {+2..} |  sed 's/$/../' )" ) || return
    echo $(echo "$target" | awk -F "\t" '{print $2}')
}
# Filter branches and checkout the selected one with <enter> key,
git-co-fzf() {
    is_in_git_repo || return
    git checkout $(git-br-fzf)
}
# Filter commit logs. The diff is shown on the preview window.
git-log-fzf() { # fshow - git commit browser
    is_in_git_repo || return

    _gitLogLineToHash="echo {} | grep -o '[a-f0-9]\{7\}' | head -1"
    _viewGitLogLine="$_gitLogLineToHash | xargs -I % sh -c 'git show --color=always %'"
    git log --graph --color=always \
	--format="%C(auto)%h%d [%an] %s %C(black)%C(bold)%cr" "$@" |
    fzf --ansi --no-sort --reverse --tiebreak=index --bind=ctrl-s:toggle-sort \
	--preview="$_viewGitLogLine" \
	--bind "ctrl-m:execute:
		(grep -o '[a-f0-9]\{7\}' | head -1 |
		xargs -I % sh -c 'git show --color=always % | less -R') << 'FZF-EOF'
		{}
FZF-EOF"
}

git-br-fzf and git-co-fzf work like this.

nil

git-log-fzf works like this.

nil

Batch generation of font preview images with multicore processing

Abstract

Our video generation service RICHKA enables users to customize image/video materials and texts, fonts, BGM, color schemes and the latter video generations are run with the configurations.

In this post, we introduce a background processing of the font customizing feature, especially auto generation of preview font images actually rendered by the underlying font engine with font files installed on the OS with multi-core processing. If the number of the fonts is few around 10, it is possible to manually create them with taking screenshots and cropping desired areas and save as image file. However, our video servers have over 1000 fonts and it is still increasing and difficult to do by hand. To resolve such cases, a batch processing helps us, but high speed techniques become also important.

The generated preview images are actually shown on the GUI below and users can visually select desired fonts used for the video generation. The whole source code is also introduced and with utilizing some convenient Linux commands as this script, we can implement in short time.

nil

Multi-core processing

On RICHKA video servers, the number of installed fonts are over 1000 and it takes much time to execute with sequential batch processing to generate the font preview images. However, we can shorten the heavy processing with applying multi-core processing to generate them in parallel because each processing is independent each other and it is general to have multi-core CPU these days.

The multi-core processing is easy thanks to Python3 builtin package multiprocessing. The excerpt of a sample program below is to call gen_preview_image with multi-core CPU. When it has prepared 100 data sets, they are executed in parallel. In this example, the max number of the used CPU core at a time is 1 less number than the number of CPU cores. The result values returned from the function gen_preview_image are accumulated and we can get all of the results as well.

def process_multicore(func_ptr, dset):
    import multiprocessing as multi
    p = multi.Pool(multi.cpu_count() - 1) # max number of processes
    result = p.starmap(func_ptr, dset)
    p.close()
    p.join()
    return result

def run_all(fontdir, outdir, is_overwrite=False):
    # init
    if not os.path.exists(outdir):
	os.mkdir(outdir)

    fontfiles = [f for f in glob.glob(fontdir + "**/*.*", recursive=True)]

    dset = []
    results = []

    for fontfile in fontfiles:
	dset.append((fontfile, outdir, is_overwrite))

	if len(dset) > 100:
	    res = process_multicore(gen_preview_image, dset)
	    results.extend(res)
	    dset = []
    if len(dset):
	res = process_multicore(gen_preview_image, dset)
	results.extend(res)

    return results

if __name__ == '__main__':
    logging.basicConfig(level=logging.DEBUG)

    fontDirs = [f'/usr/share/fonts/']
    results = []
    for fontDir in fontDirs:
	result = run_all(fontDir, f'/home/{getpass.getuser()}/tmp/font_images/')
	results = results + result
    print(json.dumps(results))

Sample program

The whole source code is below and we use convert command of ImageMagic to generate font preview images. The images are actually rendered by a font engine of the OS such as FreeType. The rendered characters are 'あいうえおアイウエオABCDabcd' in default including Japanese, but some of fonts don't have the Japanese griph data, then 'ABCDEFGabcdefg' is rendered as fallback.

#!/usr/bin/env python
import logging
import getpass
import glob
import json
import os
import shutil
import sys
import subprocess
from fontTools import ttLib

def shortName(font):
    """Get the short name from the font's names table"""
    name = ""
    for record in font['name'].names:
	if b'\x00' in record.string:
	    name = record.string.decode('utf-16-be')
	else:
	    name = record.string.decode('utf-8', 'surrogateescape')
    return name

def gen_preview_image(fontfile, outdir, is_overwrite=False, pointsize=40, text='あいうえおアイウエオABCDabcd', ascii_text='ABCDEFGabcdefg', fname_prefix=''):
    try:
	ttf = ttLib.TTFont(fontfile, fontNumber=0) # https://github.com/fonttools/fonttools/issues/541
	font_name = shortName(ttf)
	fname_out = os.path.join(outdir, fname_prefix + font_name.replace(' ', '_') + '.png')
	cmd = f"convert -font '{fontfile}' -pointsize {pointsize} label:{text} '{fname_out}'"
	cmd_in = cmd.encode('utf-8', 'surrogateescape')
	if is_overwrite or not os.path.exists(fname_out):
	    try:
		cmd_out = subprocess.getoutput(cmd_in)
	    except subprocess.CalledProcessError as grepexc:
		logging.debug("error and try only with ascii:", grepexc.returncode, grepexc.output, fontfile)
		cmd = f'convert -font {fontfile} -pointsize {pointsize} label:{ascii_text} {fname_out}'
		cmd_in = cmd.encode('utf-8', 'surrogateescape')
		try:
		    cmd_out = subprocess.getoutput(cmd_in)
		except subprocess.CalledProcessError as grepexc:
		    logging.debug("error :", grepexc.returncode, grepexc.output, fontfile)
		    fname_out = None
	return {'preview_image_path': fname_out, 'name': font_name, 'path_font': fontfile}
    except ttLib.TTLibError as e:
	logging.debug(e)
	return {'preview_image_path': None, 'name': 'UNKNOWN', 'path_font': fontfile}

def process_multicore(func_ptr, dset):
    import multiprocessing as multi
    p = multi.Pool(multi.cpu_count() - 1) # max number of processes
    result = p.starmap(func_ptr, dset)
    p.close()
    p.join()
    return result

def run_all(fontdir, outdir, is_overwrite=False):
    # init
    if not os.path.exists(outdir):
	os.mkdir(outdir)

    fontfiles = [f for f in glob.glob(fontdir + "**/*.*", recursive=True)]

    dset = []
    results = []

    for fontfile in fontfiles:
	dset.append((fontfile, outdir, is_overwrite))

	if len(dset) > 100:
	    res = process_multicore(gen_preview_image, dset)
	    results.extend(res)
	    dset = []
    if len(dset):
	res = process_multicore(gen_preview_image, dset)
	results.extend(res)

    return results

if __name__ == '__main__':
    logging.basicConfig(level=logging.DEBUG)

    fontDirs = [f'/usr/share/fonts/']
    results = []
    for fontDir in fontDirs:
	result = run_all(fontDir, f'/home/{getpass.getuser()}/tmp/font_images/')
	results = results + result
    print(json.dumps(results))

Sample of generated preview images

It took a few minutes to have generated the preview images with over 1000 fonts and the sample ones are below. The processing speed is enough and we can utilize the max of the CPU resources.

nil

Conclusion

We introduced a practical sample program to execute a batch processing to generate font preview images with over 1000 fonts with utilizing multi-core CPU. Though we omitted in the sample code, our video servers stores the generated preview images into S3 and they are actually shown on RICHKA GUI and it helps users to visually select desired fonts used for video generation.

Realtime Display of Video Generation Progress

Abstract

The video generation in RICHKA is to serialize high quality videos on video servers with using video templates designed by export designers. The processing is heavy load and takes several minutes, therefore RICHKA has a dedicated GUI feature to show the progress ratio in realtime so that users can check the remained waiting time. During the processing, video servers monitor the detail progresses and transmit to web servers to feedback to users on GUI.

RICHKA uses HTTP streaming for the realtime transmitting of the progress ratio among servers. This feature is to continue send application data little by little formatted with HTTP chunked encoding. During sending them, the TCP connection is kept to open. The HTTP streaming is available on general high-level web server frameworks as well and we are ready to apply to product services without taking care the underlying protocol format by ourselves. However, we need to understand the restriction that the HTTP connection is per URL. The restriction is simple, but we sometimes encounter difficulties on practical service products.

In the case of RICHKA, when users click a button to generate videos on editing pages, it redirects users to top page to see the progress ration on the video list so that users can edit other videos during generation videos. Then, the TCP connection between web browsers and web servers are disconnected in redirecting because of the restriction and the progress reporting from video servers don't reach to web browsers. To enable to show the realtime progress after HTTP redirecting, RICHKA has a dedicated server side processing and this post explains how RICHKA does. There are several alternatives to realize this feature, but RICHKA doesn't depend on additional external services and the internal architecture is also simple and straight forward. I think this architecture could be applied to general use cases and I hope this post provides some hints to readers of this blog.

Technical Restriction of HTTP streaming

nil

The figure above represents the detail procedure how the progress reporting with the HTTP streaming is blocked. The bottom is the GUI of RICHKA and the left side is the editing page to input user data and the right side is the top page listing up users' videos. The blue arrow represents the HTTP redirect to navigate users to a top page and it is triggered when users click the button of video generation on the editing pages. In the timing, the HTTP streaming response from web servers are disconnected and the top page can't get the further progress ratio. The detail procedure in the figure is below.

  1. On edit pages, when users click a button to generate videos, it sends a HTTP request with XMLHttpRequest to one of web serves via load balancer. Then the browser is redirect to the top page listing video data.
  2. The Web server delegates the video generation to one of video servers with sending a HTTP request again. The video server loads a video template and start to generate a video
  3. During generating, the video server sends the progress ratio with HTTP chunked encoding whose application data is JSON format to the web server.
  4. The web server transfers the progress ratio received from the video server, but the TCP connection with the web browser has been already disconnected and the data can't reach it.

For a reference, the chunked transfer encoding is like this. In general, CGI scripts response with using it. Content-Length header is not used because the expected data size is not known beforehand. A chunked data starts with the payload size and it ends with a line break CR LF. In the final chunk, we need to send an empty chunked data to notify it is last one to the receiver. In RICHKA, the application data is the progress ratio formatted with JSON.

HTTP/1.1 200 OK
Content-Type: text/plain
Transfer-Encoding: chunked

5\r\n
Hello\r\n
6\r\n
RICHKA\r\n
0\r\n
\r\n

Realtime Display of Video Generation Progress after HTTP Redirect

nil

To resolve this restriction deriving from the HTTP connection per URL, RICHKA realizes the realtime feedback of progress ratio with the architecture above for the specific case of redirecting. The detail procedure is below.

  1. ditto with the prior section
  2. The web server forks a dedicated process to communicate with the video server. It sends a HTTP request and delegates the video generation. In this timing, the TCP connection is disconnected with the web browser because of the redirection.
  3. The forked process is still alive and it continues to receive the progress ratio from video serves with HTTP chunked encoding.
  4. Every when the forked process receives the progress ratio, it saves into database as the progress data for the video data.
  5. After redirecting, the top page periodically sends HTTP GET request to the web server and show the progress data on GUI.

At the last step, there is alternative method with WebSocket protocol, but RICHKA doesn't use because general users access from their company offices and it is general their networks apply HTTP proxies. Unfortunately, some of HTTP proxies block WebSocket connection to enhance the web security. Therefore, RICHKA intentionally applies the traditional method to make more stable.

Big picture of RICHKA

Abstract

This is the first post from our engineer team.

We periodically share technological topics such as new integrated features into products and new technologies we are interested in and prototype implementations to evaluate the feasibility whether they are worth developing as actual business service.

In this post, we introduce a web application RICHKA which enables users to easily create high quality videos on web browsers, especially, the development environment and the server infra structures and the processing sequence of the primary function to generate high quality videos with using image/videos users upload. The architecture and internal processing are generally complicated than general services such as EC and blog and chat system because the size of video files are huge and we need to carefully take care the load of servers such as delegating heavy processing to other dedicated video servers and applying delaying processing to postpone heavy processing later. And the load of file storage is also high and we need to take care the timing to load files from network storage. On GUI, we don't initially load video contents because it increases the load of web servers and delay the response and influences to UX. Instead, we load thumbnails of any videos on GUI and load video contents only when they are played on video player.

RICHKA has some dedicated video engines to generate high quality videos with using well designed video templates created by expert designers. To make the representation of videos richer, video servers enable to change not only input texts and image/video material files users upload, but also font family and color scheme and BGM in realtime during generating videos. The load of video generation processing is very heavy and we apply lots of optimization to reduce the generation time with keeping the high quality. Therefore video services demand higher development skills of web applications.

RICHKA Development Environment

nil

The engineer team is basically remote and more than 90% live in foreign countries. We hire only high skill experts who have strong skills of web technologies and web application development. We will describe our team more on another post later.

We always apply new emerged technologies into products to enhance the features and reduce development cost. It is free for our engineers to propose them to see the feasibility and the side effect. The speed of try and error is faster than general teams because our team is completely flat and every member has the privilege to propose new ideas among members. If clear and reasonable purposes are explained to the team, they are basically accepted.

Regarding server side, it is based on Python and Django and we use additional 42 Python packages such as Django extensions and image/video manipulation and statistics and crypt. The current total lines of Django is around 12200.

Regarding front end, we use abut 20 OSS libraries to build the functional GUI such as jQuery, cropper.js, smartcrop.js, Vue, Bootstrap and so on. The current total lines of JavaScript codes we developed is around 13000.

OS

Ubuntu Server

Programming Language

Python, JavaScript, HTML5, CSS3, JSX, Bash

Server Side Technologies

Django, MySQL, HTTP2, Web API, video generation engine, image processing, multi core processing, load distribution

Front End

jQuery, jQuery UI, Vue.js, video.js, cropper.js, smartcrop.js, Bootstrap and much more

Regression Test

Jenkins, Django UnitTest, Selenium

Sequence of video generation

nil

RICHKA is behind a load balancer to distribute lots of coming HTTP requests to multiple web servers. And to enable simultaneous video generation at a time, the video generation requests are also distributed to multiple video servers. The user data such as images/videos users upload and video template files used by video engine are stored on an external network storage. They are retrieved from both web servers and video servers.

The summary sequence of video generation is,

  1. Users click a button to generate videos and the requests reach one of web servers via the load balancer.
  2. The web server retrieves the user data such as selected video template and font families and color scheme and BGM and make HTTP requests and send to one of video servers.
  3. The web server receives the generation progress in realtime and store into the database to show the progress on GUI.
  4. When the generations have been done, the web server downloads the generated videos and store into the file storage.
  5. The web server sends the generated videos to web browsers and video player loads them and users can see on GUI.